#ts3 base game compatible tutorial
Explore tagged Tumblr posts
Text
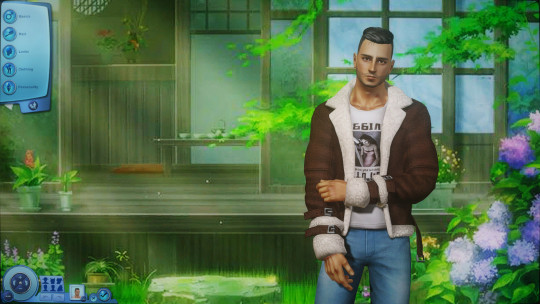
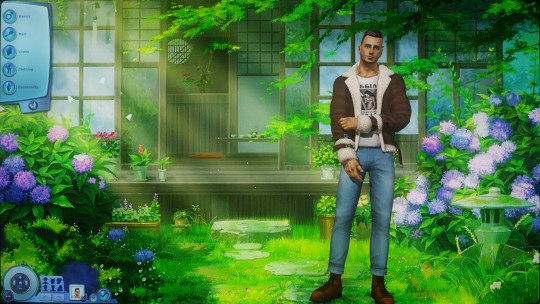
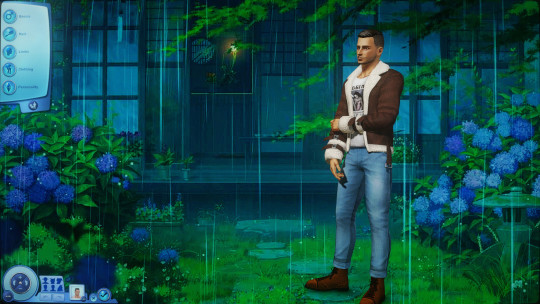
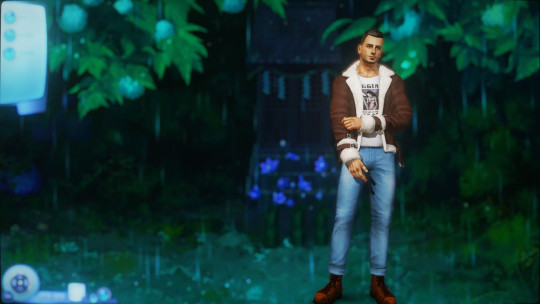
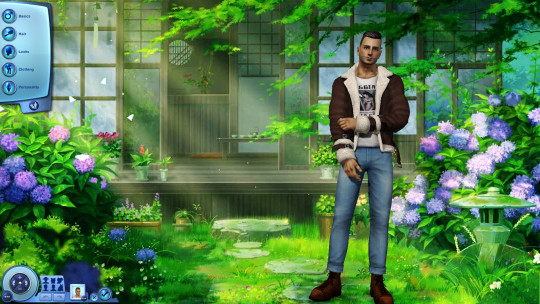
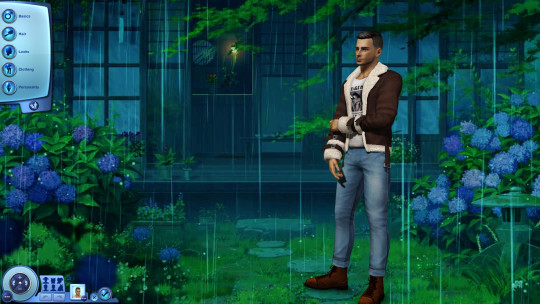
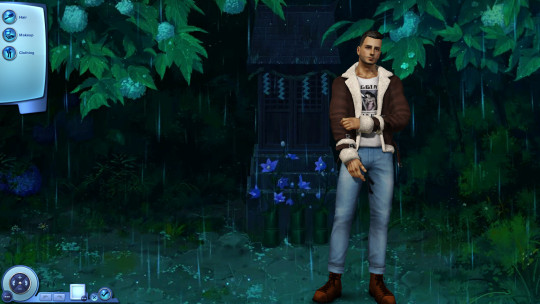
CAS Background Replacement - TS3 - Jin & Wen Sims 4
This set of 3 stunning backgrounds is by Jin & Wen Sims 4 on TSR. They look right out of a Studio Ghibli movie.
Information
The background uses a 2048x2048px image so it may slow down your computer and look blurry if graphics settings are not on high. Use at your own risk.
The CAS Room Default will replace the CAS Room, Create-a-Pet room, and the Create-a-Bot room. You can only have 1 CAS Room Default at a time. The CAS Room Default is base game compatible.
The Stylist Room Default will only replace the Stylist Room. You can only have 1 Stylist Room Default at a time. The Stylist Room is part of the Ambitions EP.
Credits
CherieDawn67 at Modthesims for creating the mod and the mesh used for the background.
@mspoodle1 for lighting & weather fixes, and for enabling further customization of the mod.
Jin & Wen Sims 4 on TSR
Me for Photoshop work and figuring out this whole malarkey in collaboration with mspoodle. This mod took a truly ridiculous number of hours of testing.
Make your own using my tutorial here!
Download: simfileshare / mega
256 notes
·
View notes
Text
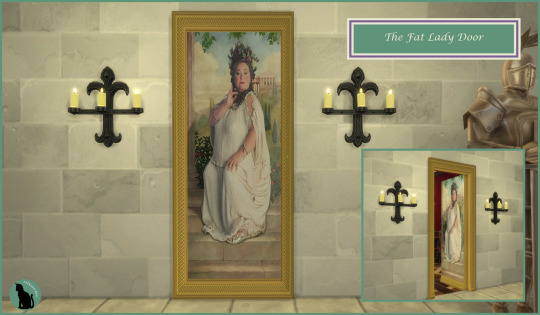
"Caput Draconis!"
The Fat Lady has guarded the Gryffindor Common Room for centuries, letting students into their home-away-from-home... if they have the password, of course!
This is the project that got me into making cc in the first place. At the end of 2020 I was building my own version of Hogwarts. I had far fewer packs and I was searching out Harry Potter-related cc to incorporate. I finally reached the Gryffindor Common Room and of course needed The Fat Lady's portrait as the entrance. Except I couldn't find one. Although I'd had one for TS3, I couldn't find an acceptable one for TS4. So I tried learning how to convert objects. I had no idea how to use blender, my texture modifier was Paint and I was teaching myself how to use TSR Workshop and Sims4Studio as I went along.
Needless to say, I failed spectacularly. The doors just didn't work. I had no idea what I was doing. I managed to follow all the steps for converting... except I was basing it on a tutorial for a deco object. Guess what doesn't get covered in such a tutorial? Weights. I ended up giving up on the door conversion, sticking the fat lady onto a base game door's texture and settling for that. Then I made paintings. Because those were doable, and moved on from there.
I actually came back to this project last May and tried again. With a few more years of experience and reading the forums I had a better idea of how to use everything and I knew weights were a thing, so I tried modifying those. I actually, somehow, made a door that functioned as a portal, except sims just stepped through the painting, at least in some cases. It failed but not as bad.
So now, nine months later, having worked with weights on several projects now (converting the Cashcraft beds most recently, as well as the various earrings from last Simblreen), I figured it was time to try again. And it worked! I got everything weight painted correctly, I actually cut up the painting mesh so it could move and now I have a proper door. The only issue is that it's a little small... but that's for a subsequent project. There is also a little bit of gapping at certain angles between the painting and the door on the reverse, but it shouldn't be too noticeable. I'm so glad I can move this from WIPs to my Completed Projects folder!
The Fat Lady is Base Game Compatible and comes in nine swatches so you have options for the reverse door (which is based on the base game six-paneled door).
I used the same base painting mesh that I adapted from @thejim07.
Download from Simfileshare here.
Made with S4S.
#simblr#the sims 4#sims#ts4#my cc#sims 4#sims 4 cc#ts4cc#ts4 custom content#ccsaturday#ts4 harry potter#ts4 wizarding world#ts4 doors#ts4 build#ts4 base game#ts4 hogwarts#ts4 magic#ts4 door#harry potter#harry potter sims#sims hogwarts#i am so bloody happy i've finally done this#the fat lady#harry potter the fat lady#wizarding portraits#ts4 secret door#ts4 hidden door
13 notes
·
View notes
Photo





RABBIT HOLE RECOLOURS AND RESCRIPTING TUTORIAL
Are you having difficulties getting the outrageously coloured rabbit holes to fit into your moody emo town? Or would you like to make your high street look like a Skittles factory had just exploded? Despair no more! Release your inner MacGyver and DIY!
Programs you need: S3oc S3pe Photoshop or Gimp (DDS plugins for Photoshop -> this and this, Gimp has this feature built in already)
// Disclaimer: This tutorial is picture and text heavy. I hate having to have bazillion different tutorials open because everyone always assumes you know what you are doing and I keep on closing tabs by accident, so this tutorial will run you through each and every step with (far too much) detail because I’m a simpleton and I need both pictures and text when learning new stuff! I have divided this into digestable parts, so you can skip ahead down the tutorial if you are familiar with some of the steps such as cloning. Pictures above are numbered and each step is explained below.
1. CLONING A RABBIT HOLE
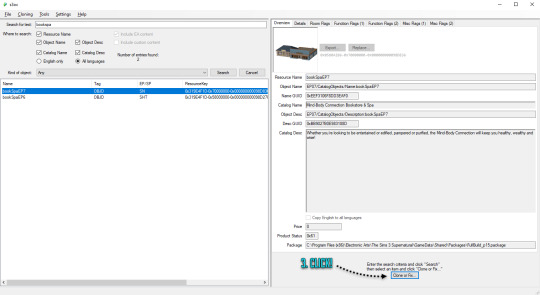
1. Open S3oc, click Cloning and Normal objects.
2. Click Tools and Search, type in keywords such as bookspa or hospital. If you still can’t find what you are looking for, then the other option is to just scroll down the list of items and try locating the rabbit hole you need.
3. Once you have found your rabbit hole, click Clone or Fix.
4. Tick all the boxes I have ticked.
5. Edit the Catalog Name and Description, these are the things you see in game when you browse through the items and stuff. If you are not fussed, leave them as is.
6. Change the file name here (Some guides mention changing it, some skip it, but I have changed mine and nothing exploded so far!) and click Start. A window pops up asking where you want to save your package, I usually create separate folders for my projects on my desktop as I don’t want to accidentally mix my .DDS files with other rabbit hole files and stuff, but if chaos is your thing just save wherever.
2. RECOLOURING A RABBIT HOLE
7. Locate your newly created rabbit hole clone .package (You can create a backup copy of it somewhere if you think you will mess up somehow) and open it with S3pe. Look through the IMG tags and find a LOD image like this. Right click and Export to file. If you are organized like I am, you can save it in your project folder with your package file... Or place it wherever because of whatever method of madness you use when editing your files. I’m not your mother. Do whatevs.
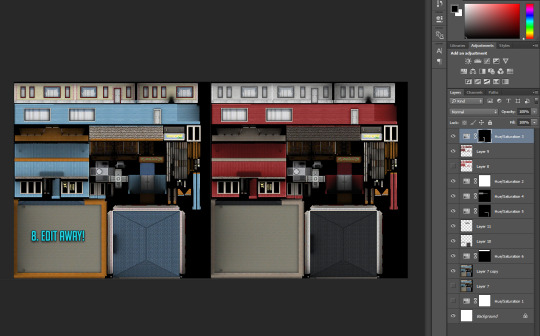
8. Now depending on which program you use, open the .DDS file in Gimp or Photoshop, if you get a pop up window just go with default size and no mipmaps. This is the step where you let your creative juices flow and take over. Want to change everything? Or only one colour? Depending on the rabbit hole you have chosen to edit it could be a really simple one click thing fix, or if you picked a more complicated one like I did, you are going to spend some time on this step. I added my before and after picture edits I did in Photoshop as an example.
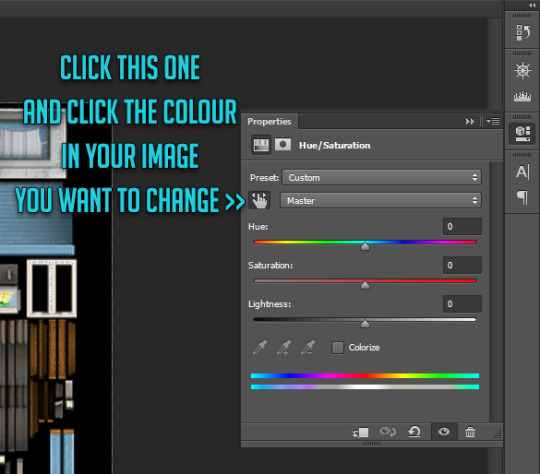
// Photoshop Tip! I’m not familiar with Gimp, so I’m not sure how well this works in there, but I abuse the hell out of Hue/Saturation and the colour picker in Photoshop to get rid of and edit the colours. Press the little hand icon in the Hue/Saturation pop up box and click the colour you want to change in the image and it picks it for you, then just use the three sliders to change your colours, easy! Be careful though! Sometimes it changes too many areas in one go, so you might have to use marquee tool to isolate the bits you want to edit so rest of the image doesn’t change (While using marquee tool you can press either Shift or Alt at the same time which allows you to add into or remove from your current selection!). Or use masks. Up to you. Then once you have selected the areas, create a new layer and hit the Hue/Saturation button and it will only impact the areas you have selected. Play with layer settings if you end up adding separate colours on top, for example my red paint layer looked best with linear light and 80% opacity.
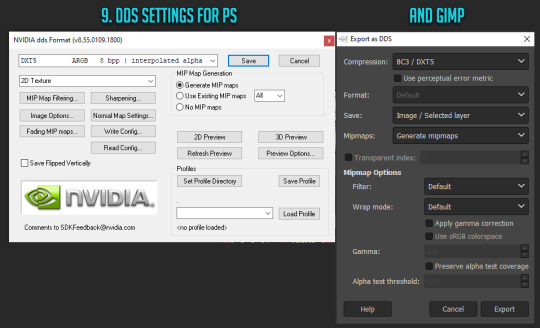
9. Once you are satisfied with your colours and you have merged your layers, this next step is different with Photoshop and Gimp. With Photoshop you can use Save As option while with Gimp you have to use Export As. Either way, save or export over/replace the image you originally opened using the .DDS settings shown (Please correct me if I’m wrong with Gimp settings as I don’t really use it!). If you have been saving as psd or changing the file’s name, make sure the name is now EXACTLY the same as when you exported it earlier. However, I’d urge you to do backup copies before overwriting the file, in case you have coloured something wrong or if you think you might want to change something after doing a test. Just you know, to save you some hassle if shit hits the fan.
10. Back to S3pe, you will now replace the image you previously exported with the edited one. Click Resources (or right click the IMG file on list you are replacing, both ways work), Import from file and pick the newly edited file, click ok on the prompt. Your old IMG file should be crossed out on the list and new IMG added (Once you save the crossed out one simply disappears). Depending on what kind of edits you did to the LOD IMG, you have to repeat exporting, editing and importing each and every IMG file corresponding to the changes you did with the first one. Be extra careful with matching the colours between the IMG files, otherwise you get some funky rabbit holes when zooming in and out! For example for my rather edit heavy LOD image I had to edit another 5 IMG files all in all in the end (Different wall bits, bit of carpet, window trims, roof!).
3. MAKING IT BASE GAME COMPATIBLE
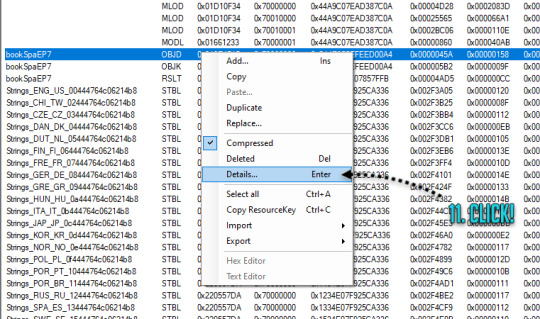
11. Done with your IMG files? Still in S3pe, locate OBJD file on the list, either hit enter or right click for Details.
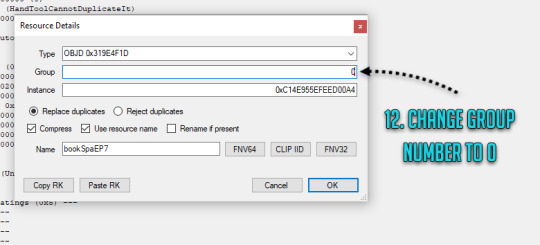
12. Change the group number from whatever to 0. Save your package.
You are done and your rabbit hole is ready to go in game! Drop it with your other .packages in your Mod folder and test it, in edit and live mode in game. Are some parts of the building still showing old colours or are they changing drastically when you zoom in or out? It’s not the end of the world! You must have forgotten to edit one of the IMG files or the colours are not matching, double check that all the bits you edited in the first image match with rest of the IMG files. Even if you got the colours right there will be a slight chance due to how Sims 3 renders items, so don’t panic unless IT’S REALLY BAD! Just look at how other nonedited Sims 3 stuff renders and compare how yours behaves. // But wait! Maybe you want to make it a default replacement rather than a new individual rabbit hole like my tutorial does? For default replacements, follow this guide.
4. CHANGING THE RABBIT HOLE SCRIPT (OPTIONAL)
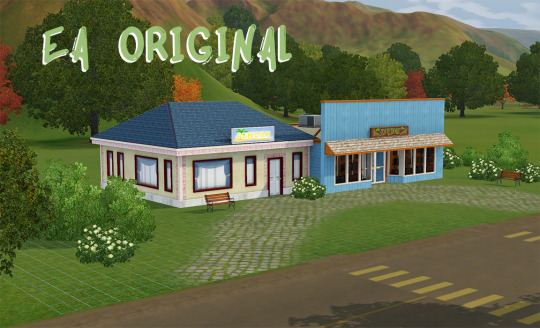
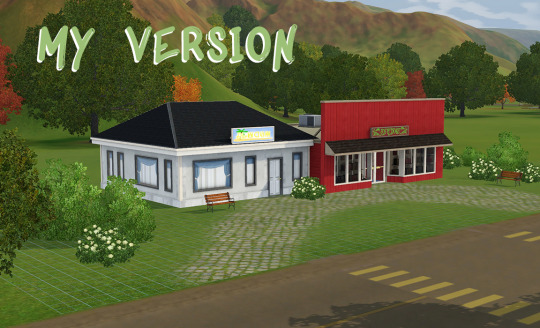
Like the look of your rabbit hole building, but don’t think it looks like a spa or a bookshop? Is it giving you a hospital and science lab vibe instead? Again, no need for anxiety! You can fix it! Sort of. It should work but be wary! If you use lets say the Annex script, you got to have University EP installed to make it work. Without the right expansion, you can’t have special careers. Just keep in mind that some scripts may not work with some buildings due to the specific animations and stuff, so test it before you release your masterpiece in the wild.
13. Open your .package in S3pe, locate OBJK file and right click Edit OBJK.
14. Replace the String bit with one of these scripts from the following list. Commit to changes and save your package. You are done!
Bookstore Sims3.Gameplay.Objects.RabbitHoles.Bookstore
Business and journalism Sims3.Gameplay.Objects.RabbitHoles.BusinessAndJournalismRabbitHole
City hall Sims3.Gameplay.Objects.RabbitHoles.CityHall
Criminal building Sims3.Gameplay.Objects.RabbitHoles.Hideout
Diner Sims3.Gameplay.Objects.RabbitHoles.Diner
Grocers Sims3.Gameplay.Objects.RabbitHoles.Grocery
Hospital Sims3.Gameplay.Objects.RabbitHoles.Hospital
Mausoleum Sims3.Gameplay.Objects.RabbitHoles.Mausoleum
Military Sims3.Gameplay.Objects.RabbitHoles.MilitaryBase
Movie studio Sims3.Gameplay.Objects.RabbitHoles.MovieSet
Police station Sims3.Gameplay.Objects.RabbitHoles.PoliceStation
School Sims3.Gameplay.Objects.RabbitHoles.SchoolRabbitHole
Science Sims3.Gameplay.Objects.RabbitHoles.ScienceLab
Spa Sims3.Gameplay.Objects.RabbitHoles.DaySpa
Sports stadium Sims3.Gameplay.Objects.RabbitHoles.Stadium
Theatre Sims3.Gameplay.Objects.RabbitHoles.Theatre
Vault Of Antiquity Sims3.Gameplay.Objects.RabbitHoles.VaultOfAntiquity
Subway Sims3.Gameplay.Objects.RabbitHoles.Subway
Fortune teller caravan Sims3.Gameplay.Objects.RabbitHoles.GypsyCaravan
Equestrian center Sims3.Gameplay.Objects.RabbitHoles.EquestrianCenter
Annex Sims3.Gameplay.Objects.RabbitHoles.Annex
Hospital & science combo Sims3.Gameplay.Objects.RabbitHoles.ComboHospitalScienceLab
School & stadium combo Sims3.Gameplay.Objects.RabbitHoles.ComboSchoolStadium
Book & spa combo Sims3.Gameplay.Objects.RabbitHoles.ComboBookstoreDaySpa
City hall, police & military combo Sims3.Gameplay.Objects.RabbitHoles.ComboCityhallPoliceMilitary
Business & bistro combo Sims3.Gameplay.Objects.RabbitHoles.ComboBusinessRestaurant
And I think that’s it. Let me know if you know a better way or I have made an error in this tutorial! Or if you want to fight me, I will meet you behind the mall by the bins for some asskicking.
#the sims 3#ts3#simblr#ts3 tutorial#ts3 rabbit hole recolour tutorial#ts3 base game compatible tutorial#ts3 cloning tutorial
166 notes
·
View notes
Photo
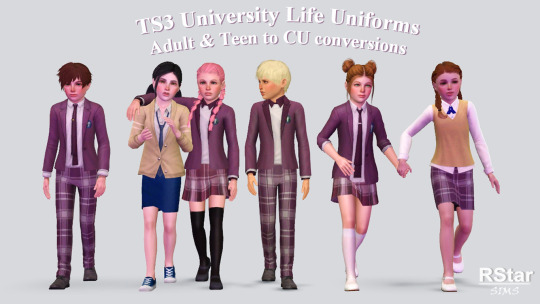
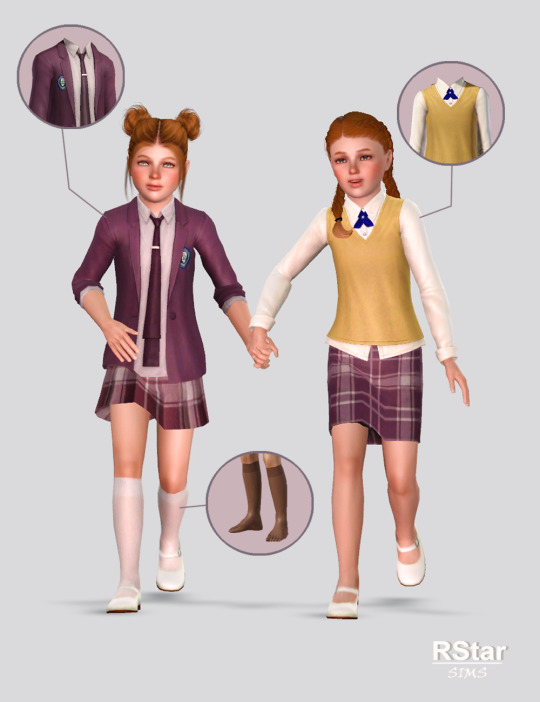
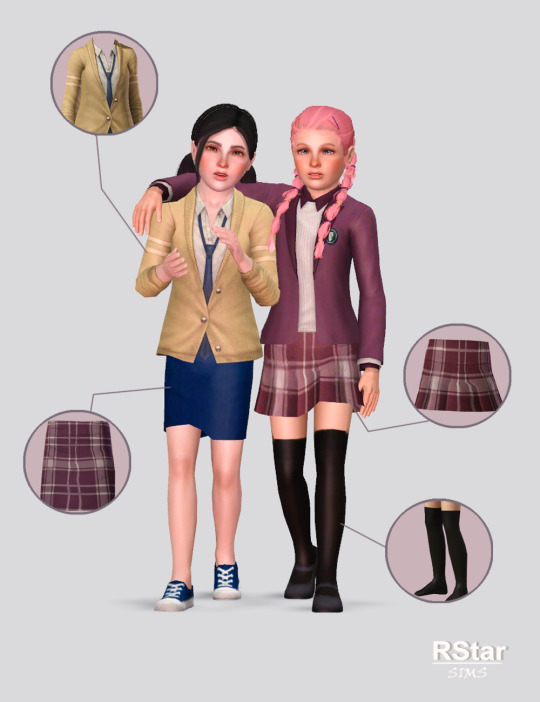
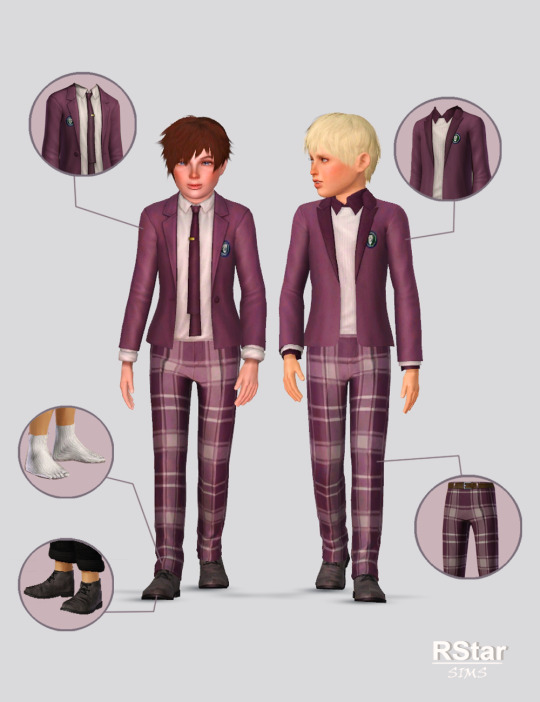
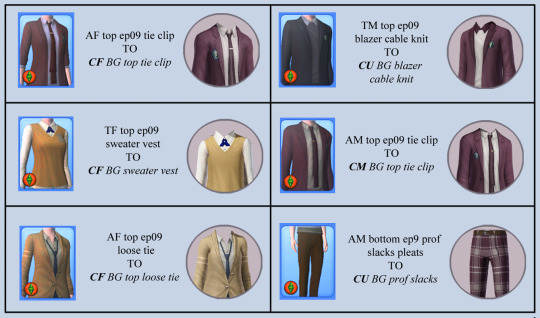
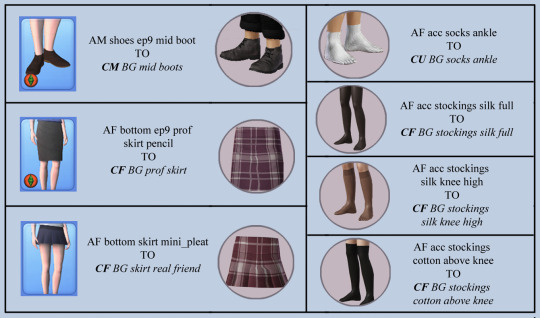
TS3 UL Uniforms converted to CU (+ some other BG items)
Needed uniforms for my -sim- kids (& wanted some game-friendly items) so I decided to make some age conversions. Probably EA didn’t want to give us ideas about open schools when they released UL without versions of these items for children 😌
* if you’re playing with open schools or just want all the kiddos in the neiborghood to wear these uniforms, take a look at the end of this post for links to instructions on how to achieve that.
Original meshes & textures by EA/Maxis;
Age: CU;
Tops, Bottoms and Accessories sections;
Categories: Everyday, Formalwear, Outerwear;
Base Game compatible;
All LODs & fully morphed;
Disabled for random - but with Nraas MC + MC Cheats, NPC children can wear them too.
Polycounts: similar to the adult and teen versions from which they have been converted;
Fully recolorable / all original stencils / for all the items that came with stencils I made the last presets non-stenciled so our kiddos can wear them on occasions outside school too;
Custom thumbnails for both Launcher and CAS (though I should’ve left the game create the thumbnails 😅 );
sims3pack & package files;
* the ankle socks are present in BG, but I forgot so I made a new item. Mine are a little lower on the ankle than EA’s. Remove them if you don’t want a sort-of-duplicate thingy 😁
……………………………………………………………
DOWNLOAD: MEDIAFIRE / SimFileShare
……………………………………………………………………
Poses used in the previews - Children Walking and talking by @poses-by-bee
……………………………………………………………
School Uniforms Tutorial by @simshai91
➡️ Written
➡️ YT video
===================================
Tag me #rstarsims3 and @rstarsims3
Happy Simming! 😁 🤗
===================================
YouTube | Patreon
————————————————————
TOU 🔊 Do not re-upload, or claim as your own. Do not put it anywhere up for download and don’t add adfly to my links.
#clothing#sims3cc#sims 3 cc#ts3child#ts3 child clothing#ts3 clothing#ts3cc#ts3 download#sims 3 age conversion#sims 3 clothes#simblr#ts3 simblr#sims 3 simblr#ts3 clothes#ts3 accessories#Accessories
1K notes
·
View notes
Text
TS3: Astronomically Better Breast Augmentation – Default Replacement Body Meshes for Male Sims

Breast augmentation? Breast augmentation.
I want to preface this post by giving a huge thanks to @justmiha97 for his participation and contribution in this project. Seriously, without his help, this entire process would've been so much more of a pain in the tits!
This is a set of default replacements for a few meshes that expose the Young Adult and Adult male Sim's torso, giving a little more detail and shape to the chest area across all morphs, as opposed to EA's eternally flat chests.
In other words, we've made moobs! Soft, squishy boobs for fat Sims, and pumped pecs for muscular Sims!
More info, in-game previews and download under the cut!
Details
Includes replacements for the following game meshes:
amTopNude - and all of its variations: singed, necklace and puka.
amBodyEP3TowelWrap - requires Late Night.
amBodySwimmingJammers - from Surf's Up Sun and Fun Collection @ the Store.
amBodyStandardSwimmingTrunks - from Roaring Heights @ the Store.
All these meshes have the new detailed chest across all morphs, as well as a slightly rounder belly in the fat morph and a new pregnancy morph. These replacement meshes add only about 310 extra triangles per mesh compared to the vanilla versions.
Preview (click for comparison)
Compatibility
The pregnant morph for the nude top will match the bottom meshes from CmarNYC’s Male Pregnancy Morphs.
This mod is incompatible with other mods that replace any of the samemeshes and their respective morphs, such as M.M.A.A.’s default replacement nude top sets, which inspired the creation of this mod. The non-default versions of these items will work properly.
The Store item replacements are based on Blams EA Store’s .package file conversions of the original Store content. Those files are required in order for the replacements to show up properly; either the individual items or the full sets from their website will work just fine.
I am unsure whether the Store item replacements will show up properly for players who have officially downloaded the content from The Sims 3 Store, but there might be a chance - if you have these, please do try them out and let me know if they work for you. They will, however, most likely not work for players with decrapified Store content.
This mod will conflict with other mods that alter the CASP resources for any of the items affected by it. Place this mod in your Overrides folder to allow it to take priority. Alternatively, you can edit or delete the CASP resources you don’t want in s3pe.
Download: SFS / Patreon
Credits & Thanks
The good version of TSRW by Lyralei, Mesh Toolkit, MorphMaker, Bone Delta Editor, s3oc, s3pe and Blender: All used throughout the different stages of the creation process.
Gimp: Creating the preview image seen at the top of this post.
k2m1too’s pose packs Strut Your Stuff and Low Down: Seen in the preview image.
Thanks to @justmiha97 for his support and contributions to this project!
Thanks to @thornowl for his tutorial for creating CAS Parts in Blender, which saved us dozens of headaches!
439 notes
·
View notes
Text
TS4 to TS3 Pose Conversion Tutorial
There was a tut for this but the information was under a readmore and the blog was deactivated so I'm gonna go ahead and reupload it here with some slight tweaks and I'm not going to put it under a readmore for the purpose of in case my blog gets deleted etc. Also not the best at explaining stuff sometimes but hope this is understandable enough!
DISCLAIMER: I’m not an expert at this this is information I learned from the original tutorial copied over as best as I could!
YOU WILL NEED:
Some knowledge of blender
This tutorial for installing the clip tool if you haven't already
blender 2.67 since everything worked for us with just that version
S4S
4T3 Rig
Blender Rigs and Clip Tool
Step one: Find a pose you want to convert, Sara and I browse this blog for poses, open S4S and open the package file by clicking my projects then finding the package for the pose you want to convert. Once it's been opened go to the clips section and export the clip, doesn't matter what you name it just export it somewhere you can find it. It will export as a .blend file.
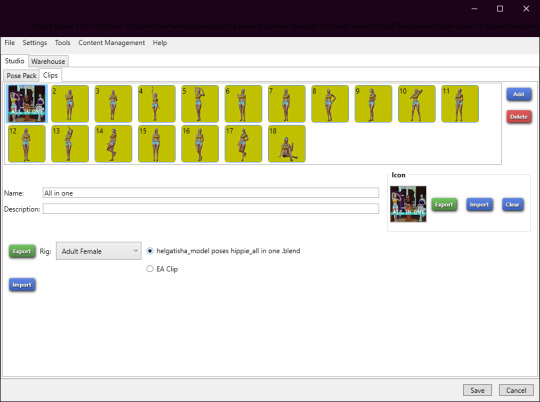
Find where you exported the pose to and double click the .blend file, the pose will open up in Blender and look like this (not the pose obviously but the side stuff)
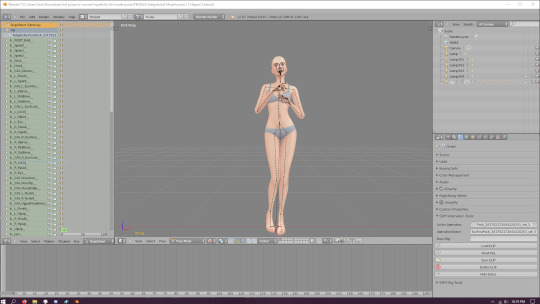
Hit A on your keyboard then hit I then click locrot once you've done that your screen should now look like this
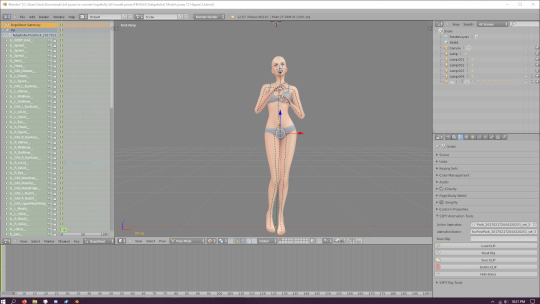
Once you've done that go under the S3PY Animations tool tab and export the clip make sure to name it something like a_mypose or whatever just make sure the a_ is there and there are no spaces. Save the clip somewhere you can find it again, now open up the 4T3 Rig Base file we provided above by double clicking it.

Import your clip using the S3PY Animations tool tab once again, make sure the one that says RIG is selected! DO NOT FIX ANYTHING! It might look wonky but we can fix the pose in the next step just don't touch anything for now! Once the pose has been imported right click the where it says rig and hit deselect, then click on where it says AFRIG and make sure it is selected, make sure the eye button on the far right is visible for AFRIG and not visible for RIG so you can see the joints.
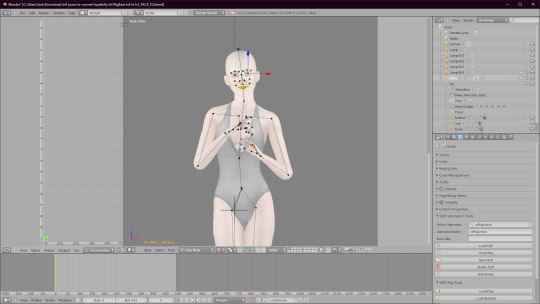
Once your screen looks like this you are going to hit A then hit I and it will automatically locrot for you. After you've done that go ahead and use the S3PY Animation tools tab yet again to export your clip, Make sure you save it somewhere you can find it easily!
Finally, open up the normal S3 rig whether it's the male or female rig is up to you just open up one of them, again use the S3PY tool to import your clip file, 9 times out of ten the eyes are going to be wonky or some fingers are going to be weirdly placed, you can go ahead and fix those now! Once the pose has been tweaked to your liking go ahead and hit A then I and hit locrot then export your clip using the same method we have the last two times and you're done!
Quickly how to import into your game: Open S3PE, new, then drag and drop your clip into the blank area, save the package, and you're done, those won't be poselist compatible but I don't use poselist anyway and there's tuts for that out there so!
If you have any questions feel free to message me I'll try to reply back as best I can though I'm really busy these days so ♥
181 notes
·
View notes
Photo

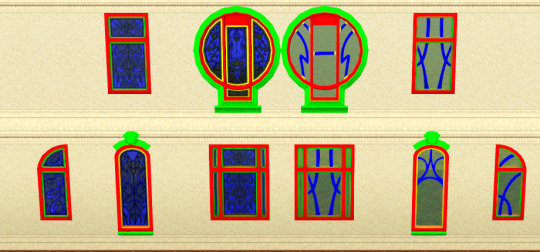


Realm of Magic 1- and 2-tile Windows - 4t3 conversion
Merry (late) Christmas, and I’m cured! Those days were difficult, but it’s all over!
And after painting stained glass textures by hand because EA glass diffuses were too small and blurry, wrestling with the TSRW wallmask edit because the generate function corrupts files, and realizing the group order of EA TS3 windows ISN’T universal and sometimes front and rear trims change order, I bring the 1- and 2-tile windows.
All EA variants, BUT: the ones with colored stained glass are on a separate file. Windows and the Phong Alpha channel do not mix well. It will work, but there’s some inner trim bleeding when you rotate the camera. Due to how windows work, I can’t change group order to avoid the “back-to-front” problem or... things get worse, believe me. If that’s a dealbreaker to you, don’t use them. I did my best, I swear :x
Base-game compatible. All categorized in Build Mode > Windows, recolor channels shown on pictures. Colored stained glass semirecolorable, so if you want it more translucent, make it darker. I strongly suggest using black for the 3rd channel with the clear stained glass variants - it “thickens” the outlines. And yes, I got lazy in the round window and used only one mask for all variants - it works well, just remember to paint the 4th channel with the color you want for the variants without the inner trim.
Clear and colored windows have the same price.
Waning Moon Window: $50 Astral Window: $80 Window of Opportunity (both 1 and 2 tiles): $80 Divine Porthole Window: $210 There was a 2-tile, off-center version of the half-moon window to fit the 2-tile version of the rectangular one, but making it align properly is still a bit beyond my skills. It’s the same mesh with the same textures, just on a 2-tile base and off-center, for those who are interested in trying to convert it. And guys, please, if they crash, freeze, or do any kind of weird stuff in-game PLEASE TELL ME. Those are my first window conversions, and while I already fixed the wallmask corruption BEFORE preparing it to upload and also tested the windows on a proper lot instead of my Lazy Preview Wall, we all know every game is different :P
Last, preview lot credit: SpearsIntrumental at MTS. Door is by ShinoKCR from her Art Nouveau Build Set. And my absolute thanks to @murfeelee for her window converting tutorial - I wanted to convert windows for a long time, never figured how it worked, AND for the colored multiplier discovery - this little thing is a BREAKTHROUGH for CC that would work great with recolors but is simply too complex for mere 4 channels.
DOWNLOAD (SFS, package) DOWNLOAD (Dropbox, package)
334 notes
·
View notes
Text
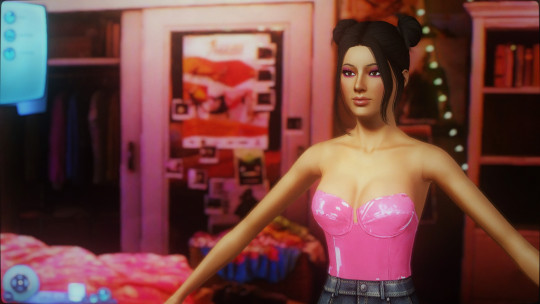
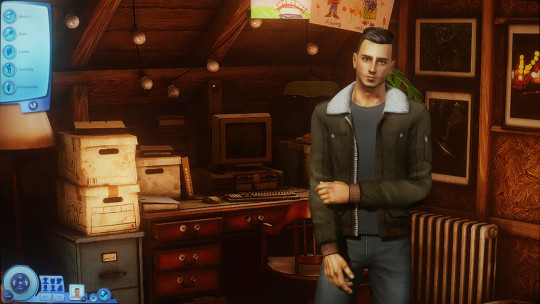
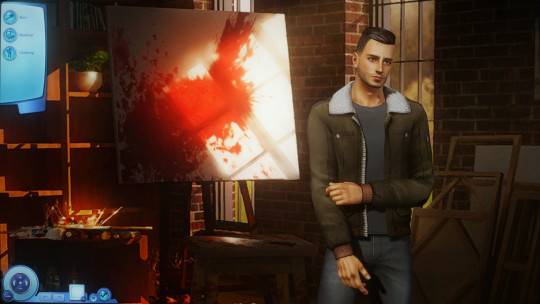
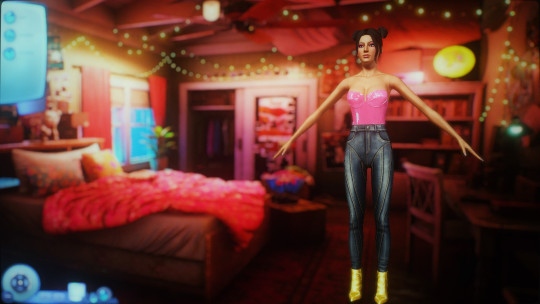
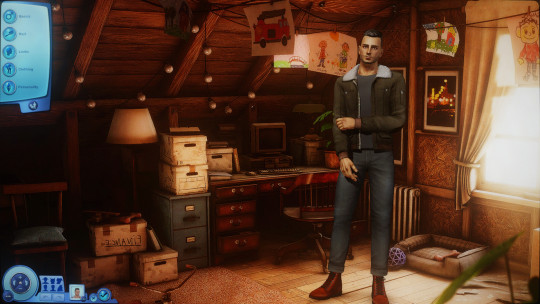
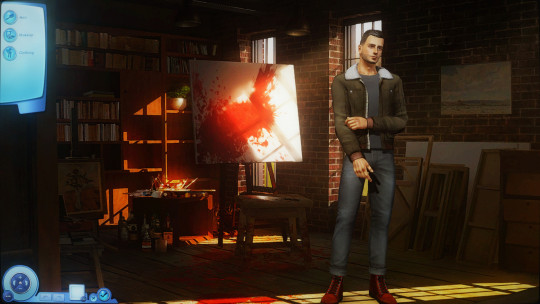
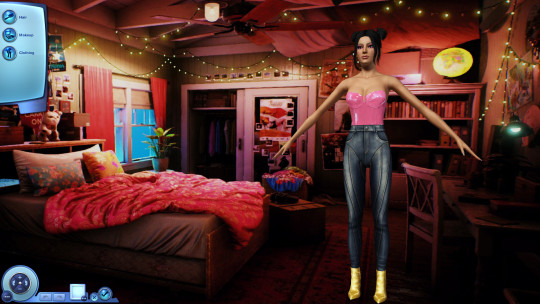
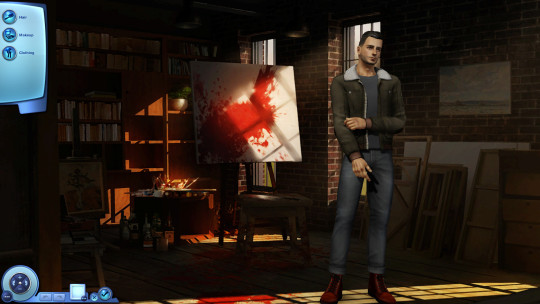
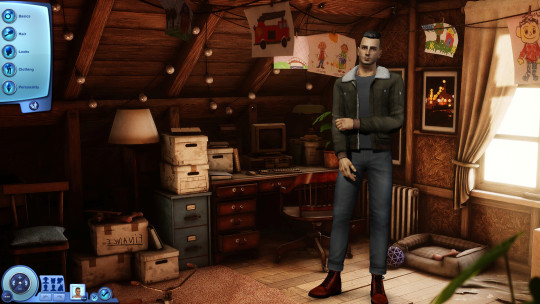
CAS Background Replacement - TS3 - Praleska
This dreamy, cozy set of 3 backgrounds is by Praleska.
Information
The background uses a 2048x2048px image so it may slow down your computer and look blurry if graphics settings are not on high. Use at your own risk.
The CAS Room Default will replace the CAS Room, Create-a-Pet room, and the Create-a-Bot room. You can only have 1 CAS Room Default at a time. The CAS Room Default is base game compatible.
The Stylist Room Default will only replace the Stylist Room. You can only have 1 Stylist Room Default at a time. The Stylist Room is part of the Ambitions EP.
Credits
CherieDawn67 at Modthesims for creating the mod and the mesh used for the background.
@mspoodle1 for lighting & weather fixes, and for enabling further customization of the mod.
Praleska on Patreon
Me for Photoshop work and figuring out this whole malarkey in collaboration with mspoodle. This mod took a truly ridiculous number of hours of testing.
Make your own using my tutorial here!
Download: simfileshare / mega
197 notes
·
View notes
Photo


Seasons Retro Swimsuit - 4t3 conversion
Because I tend to prefer more covering suits, not because of religion, politics, or something like that - just a matter of taste (and because sand in your ass is... not a good thing). So when I saw the TS4 Seasons retro swimsuit and @gruesim‘s tutorials, I had to do something about it.
I tried to adjust the TS4 mesh (which is practically a nude mesh with the bow and buttons attached) to the TS3 body, it... did not look that good, so I extracted only the 3D parts and put on a TS3 base body. Worked quite well and saved me many hours of work. Still, I had some hurdles with texturing / mapping: the halter strap is not perfect, same for the texture stretching on the top sides. A bit between the thighs, but you gotta search for it, too. Nothing that serious and I believe the suit is acceptable for a public release.
... Now I understand why 4t3 clothing converters tend to prefer baggier clothes.
But back on track: YA-A/F, Swimwear, Maternity enabled, disabled for random. Has CAS thumbnails, base game compatible. All morphs. Three channels: Top, bottom/straps, buttons (following TS4 coloring scheme + making the buttons an extra channel). The second preset, the white and pink one, has 2x2 tiling instead of 4x4 on the first channel to allow for larger polkadots, so it looks more similar to the TS4 original.
Feel free to edit, convert to other ages, etc, just @ me when you post it so I can have a look. No need to ask before!
Before the links, a heads-up: the model is a young adult, she’s just petite. Good opportunity to show that the thin morph works fine to the public (the others work fine, too, tested them on TSRW, of course).
DOWNLOAD (SFS, package) DOWNLOAD (Dropbox, package)
155 notes
·
View notes